
Coffee Break: SCOM alerting basics explained
Bruce Cullen / Sameer MhaisekarAlerts are a core part of SCOM but aren’t always intuitive to work with and set up. So, we asked Sameer Mhaisekar, Technical Evangelist at SquaredUp, to explain SCOM alerting basics to us in the latest SCOMathon Coffee Break. Here’s what we learnt.
What are alerts and why do you need them?
Before we dive into SCOM alerts specifically, let’s look a little closer at what alerts are, why we need them, and what we should be doing with them, and what happens if we miss them.
Essentially, alerts are events that need attention. Alerts are an indication of an event change or anomaly that you want to know about. In monitoring, this could be triggered for example when a certain Windows event has occurred, a service has stopped, or storage is running out of space.
There are two types of alerts:
- Proactive
- Reactive
Proactive alerts warn you at a threshold before something becomes an issue, like an alert that tells you a disk is running out of space before the disk fails. You have a chance to act before failure.
Reactive alerts inform you when something is already broken, such as a service going down. You can only react to this problem as it’s already happened.
A useful alert will contain:
- Importance/Urgency (Severity/Priority)
- Position in the lifecycle (Resolution State)
- A sensible summary in its name
- More detailed description (possible causes, resolutions)
- Source!
In monitoring, the severity could be anything from informational to critical. Informational alerts are an FYI that is something you should consider but may not need an action. Warning alerts let you know of an event that needs to have an action taken as the issue could become serious if ignored. And critical alerts are the most severe where an immediate action is required and are having the biggest impact on business.
Resolution states are labels for where the alert is in its lifecycle – pending, closed, etc. You can even customise your states to show who the alert is assigned to, for example. Resolution states can really help with automation.
Every alert needs a sensible name so you know which event the alert relates to. Knowing that a service is down is only so helpful but having the name of the service in the alert name allows you to act on the alert.
Having a more detailed description in the alerts also helps with diagnosing possible causes and potential resolutions. It should say when the alert was generated and what caused the alert as well as suggest what steps could be taken next.
Finally, you need to know the source of the alert! You want to know not just which service has stopped but also on which server so you can actually do something about it.
SCOM Alerts
Now, let’s look at SCOM alerts, specifically.

SCOM alert tip: check the knowledge section beneath an alert to find hints and tips on how to solve the problem the alert points to.
There are two places (or workflows, as it’s called in SCOM) that alerts can come from within SCOM: monitors and rules.
Though these terms can be confusing at first, there are important differences you need to learn.
Monitors affect the health state of an object.
Rules have no effect on the health of the object.
Therefore, you use different tuning strategies for alerts depending on whether they are coming from a monitor or a rule.
Monitors
Monitors alert only when the health state changes.
- Healthy
- Warning
- Critical
If a monitor turns yellow or red, the underlying object will also turn yellow or red. Here’s a handy chart for when a monitor will generate an alert.

It’s worth remembering that monitor alerts will auto-resolve if the underlying monitor goes back to healthy. For instance, if a CPU alert is generated because it is at 90%, but then it settles down and goes back below the warning threshold, the monitor will turn healthy again and the alert will disappear from the console.
Because monitor alerts are based on health changes, it can be easy to miss an alert. If a critical alert appears in the console and you fix it, the alert will not know that and will remain critical. If this alert isn’t dealt with to clear it and another critical health change takes place for the same monitor, you won’t get notified again because the monitor is already registered as being in a critical status and never went back to healthy.
So, there are three ways to reset a monitor.
- Manual reset
- Timer reset
- Event reset
Manual resets are not ideal as they rely on you remembering to edit each alert. If you fail to reset it and a new issue arises on the same monitor, you won’t be alerted.
Timer resets mean that you have pre-set all monitors to be reset to healthy every ten minutes, for example, regardless of whether something has been done to the alert again. Then, if the monitor is still critical, it will generate an alert again. This could, however, mean you end up with recurring alerts every 10 minutes.
The final option is an event reset which only resets the alert to healthy when a Windows event is detected that shows an action has been taken on that alert. So, the monitor remains red unless a healthy status is detected. This stops recurring alerts for the same event.
Monitor types
There are different monitor types that reflect what functions they perform.
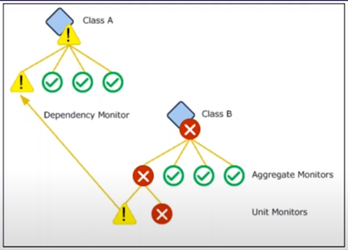
Unit Monitors do the heavy lifting of running scripts and workflows, collects the outputs, compares them with the conditions you’ve set, and raises an alert if a violation is detected.
Aggregate Rollup Monitors oversee a group of unit monitors. The health of the child unit monitors rolls up to the health of the aggregate monitors.
You can set up a couple of health policies on aggregate rollup monitors to indicate the health of the child monitors. They are called ‘the best of’ policies or ‘the worst of’ policies.
If you want the aggregate rollup monitor to only change health status when all the child monitors are critical, you should choose ‘the best of’ policies.
If you want the aggregate rollup monitor to only change health status when any one of the child monitors are critical, you should choose ‘the worst of’ policies.
Dependency Rollup Monitors rolls up the health state from targets linked by either a hosting or a containment relationship (whereas rollup monitors only work with objects in the same class). Using a dependency rollup monitor, you can link objects of different classes.
For example, in SCOM, the Windows Server class is different from the Logical Disk class and bound by a containment relationship. This lets you tell SCOM that the Server should be in a critical status if one of the instances in the Logical Disk class is critical.
Hint: What is a class? A class groups objects of the same nature together. All instances of a class will have the same properties. A class could be disks or Windows operating systems, for example. And you can have sub-classes. For example, under windows operating systems, you could have sub-classes like the Windows Server 2012 operating system class and the 2016 operating system class.
Classes give you the granularity to target objects more specifically.
Rules
Remember that rules do not cause health of the object to change. This does mean that an object can look healthy on the surface but have several alerts raised by rules.
Unlike monitors, which alert when a health state changes, rules will keep creating alerts every time an anomaly is detected for as long as the condition remains true. This is why alerts can be seen to get spammy if not suppressed.
So, whenever you create a rule of your own, make sure you put a suppression rule on it so it only increases the repeat count for the same alert rather than creating a new one each time.
Because the rule alerts aren’t linked to health states, they will not auto-close. This can be either good or bad, depending on what the alert is about and how you want to treat that alert. If you want an alert to keep repeating to nag the admin to fix something, that’s fine, but it’s usually not preferable. So put a suppression rule on it.
Rule Types
Some rules are alert generating. Others are not.
Alert generating rules check a condition and create an alert if that condition is not met.
Collection rules do not create alerts. These collect data from agents and save it in the databases. That’s all they do. But you can use that data to run your reports. There are two types of collection rules:
- Performance rules
- Events rules
Performance rules collect metric data and save it as a time series. This could be data on agents, for example.
Event rules will collect events in a text or log format.
Command rules are used less but these let you run a command or script on a set interval. This could allow you do something like create a PowerShell script that closes alerts every six days.
Overrides
Let’s now move onto overrides. There are thousands of monitors and rules that are imported via your management packs, but you don’t have to always agree with the parameters, thresholds, and frequencies of those default rules or monitors. In fact, we highly recommend you modify or even turn off a lot of them because they will not be relevant to your organization. Best practice is to start with as few as possible turned on, then add where needed. This will reduce the amount of alert noise SCOM generates.
This is where Overrides come in. They let you make changes to the default parameters of a monitor or a rule. You can change things like:
- How frequently it’s running
- Thresholds in threshold monitors
- Timeout periods for running scripts
- And more
You can modify the behaviour of an instance, a group, or even a class. You can start with the rule, for example, that is targeted at all Windows servers but you only want to turn it on for a group of servers. So, you create a subset of those servers then turn on the rule for only this group in the overwrite for that monitor. Then it will be only active for this group and nothing else.

Best practice is to save the different overrides in separate, dedicated Management Packs. This lets you go back to your original configuration without falling into the rabbit hole of hunting for your overrides. Just keep everything tidy and you’ll make your life easier and the life of anyone who you hand this over to easier as well.
Don’t save overrides in the default management packs. It has the potential to destroy your management group and at its least impactful creates an administrative nightmare for future you to unpick.
Tasks
Let’s also touch on tasks. They’re not alerts, but they are related.
Tasks are grossly underrated and not used nearly as much as they should be!
Tasks are actions you can take in response to an alert. For example, you could set up a task to remotely start a service that has stopped, or terminate processes that are consuming the most CPU when the CPU is running high. Or you can run a diagnostic task that will run in the background and collect more data on
You can run tasks manually by clicking on a button or you can set them as recover or diagnostic tasks that are triggered automatically as soon as an alert is detected.
There are two types of tasks.
Console tasks run on the server where the console is installed.
Agent tasks run on the agent remotely so you can run the task from SCOM without having to log into your servers.
Because the whole architecture of SCOM is such that you’ve got agents on everything you’re monitoring, you can use those agents to do anything you like. So, these agent tasks are super useful for collecting information and taking actions based on the machines those agents are installed on.
When to use a monitor vs. a rule
So, when should you use a monitor and when should you use a rule?
Use a monitor when you want:
- A visual cue for the object’s health state (Red/Yellow/Green)
- To auto-resolve alerts
- Performance threshold-based alerting
Use a rule when you don’t want to alert at all. You simply want:
- To collect performance or events
- Alerts not reflecting the overall health state
- No auto-resolution of alerts
If you want an immediate, critical alert that you will notice, use a monitor alert. But if it can wait a little, you might use a rule alert as it’s less noticeable and does not change the health state, nor does it auto-close the alert.
But remember, if you are using a third-party management pack, you may not have a choice in which alert types you get.
Before you set up alerts and overrides, talk with the people responsible for the servers in your organisation and find out what they want to be alerted on from those servers.
Cookdown has a tool called EasyTune that will generate CSV files for a scope, like a management pack, that will capture the workflows for you to discuss which alerts you want on or off.

Take a look at the Coffee Break recording for a live demo of what SCOM alerts look like from 49:00.
Notifications
Finally, we need to look at how to send alerts out of SCOM. Figure out what you want to send (subscriptions), how you want to send it (channels), and who you want to send it to (subscribers).
There are a few channel options to choose from:
- Emails
- Instant Messaging (IM)
- SMS
- Command notification – this lets you run commands or scripts in response to an alert.
Subscribers are the people, or email IDs, that you want to send your alerts to. You can specify individual or multiple email IDs or even a distribution list. This means you could send alerts to all in the NOC team, for example.
Subscriptions define the criteria that must be met before an alert is sent out. So you could, for instance, send out alerts with a specific severity, or alerts that are coming only from a specific set of monitors, or alerts that have a specific substring in their names. You can even combine criteria and apply ‘and’ logic to it.
See a demo by Sameer on how to set these up in the Coffee Break recording at 01:07:00.
We’ve covered a huge amount in this one Coffee Break and it’s clear that SCOM can get quite complex. But SCOM alerts are also super powerful so learn to use them well.
You can continue to learn even more at https://www.cookdown.com/blog/scom-alert-basics
If you want to suggest more Coffee Break topics, email us at [email protected] or Tweet us at @scomathon.